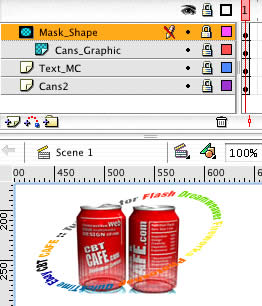
Select the Pen
Tool and draw out a shape around the parts of the cans
where you want to hide the text. For example, in the image
below, I drew a shape around the top left can which is where
I want the text to "go behind" the cans.
Make the Mask_Shape layer a mask
layer by right-clicking
on the layer and choosing Mask from the drop down menu. This will automatically lock the
layer and you'll be able to preview the masking effect.
Preview your movie by clicking
Control-Enter/Command-Enter
Save your movie
If parts of your text are still visible over the cans, go
back and unlock your Mask_Shape and adjust the mask to cover
more of the cans.
OPTIONAL STEP 1: Creating
the Animated Text Shadow
You can quickly and easily create a shadow effect for
your text animation by copying
the Text_MC at Frame 1 (right-click
on Frame 1 of the Text_MC layer)
Paste the copied frame on
a New Layer by right-clicking
at Frame 1 of the new layer and choosing Paste
Frames
Drag the new layer to the
bottom of the other 4 layers
Name the layer Shadow_Text
Change the Tint of the
copied Text_MC layer to a light gray by selecting it and
going
to the Property inspector and selecting Tint from the
Color option.
Reposition the shadow Text_MC by Scaling
and Rotating it. You may also
need to resize the movie clip.
OPTIONAL STEP 2: Creating
One Movie Clip From All Layers
You may want to convert all 5 layers
to a single movie clip.
This will make it easier to move your movie around. It will
also make it easier to resize your
movie
if you need to.
Click on the top layer at Frame 1 and drag down to the
bottom to select all frames
With all layers selected, go up to Edit > Copy
Frames
Go to Insert > New Symbol... and create a new Movie
Clip named Animated
Text_MC
Right-click in Frame 1 of
the new movie clip and choose Paste
Frames from the drop down menu
Return to the main stage by clicking Control-E/Command-E
Create a new layer
Delete the bottom 5 layers, you no longer need them
Open the Library (Control-L/Command-L)
and from the Library, drag
an instance of Animated Text_MC to the stage. You now have
a movie clip you can easily drag around the stage.
We've added 4 New Movies to our
Flash 5 source files cd! These include detailed videos on:
1. Tell Target/With
2. Dynamic Text 1
3. Dynamic Text 2
4. Animated Fly Out menu Part 2
-------
About the CDROM:
These movies are the SAME content found in our Flash 5 tutorials, but
the quality is clearly better than the streaming, web-compressed format
we have online with Frame Rates up to 20 TIMES FASTER and CD-ROM quality
AUDIO!
Flash®, Fireworks™, and Dreamweaver® are registered trademarks
of Macromedia, Inc. in the United States and/or other countries
Photoshop®, Photoshop Elements® and Illustrator® are registered
trademarks of Adobe Systems, Inc.
QuickTime® is a registered trademark of Apple Computer, Inc.
Ebay® is a registered trademark