 |
|
|
CBT Cafe > Photoshop > Textures & Patterns Photoshop: Rock Texture EffectStep 1. Create a new file Step 2. Create a New Layer. (Layer>New Layer) Step 3. In this example we'll apply the texture to some text
Step 4. Choose a font for the text I selected Arial Black which is a large font that will work nicely with the texture.
Step 5. Type out some text After you've made your type, select a color and fill in the selection. (Edit>Fill Foreground Color)
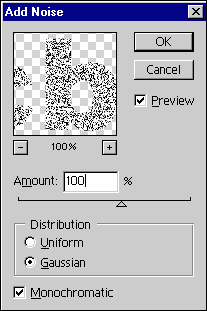
Step 6. With the type selected, create a New Layer on top of the current layer. (Layer>New Layer) Step 7. On this new top layer, fill the selection with white A quick way to do this is to click the D key once to set the foreground/background to their default colors and then click command-delete/control-backspace to fill with the background color of white. Step 8. Add some noise to it Go up to Filter>Add Noise... You can use my settings here or experiment with your own. Just make sure the Monochromatic option is selected.
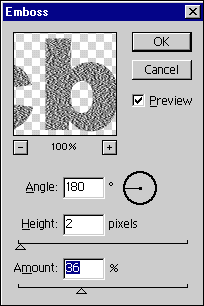
Step 9. Go up to Filter>Stylize>Emboss... Again, note my settings but feel free to experiment.
Step 10. In the Blending Mode options, select Overlay Step 11. Deselect and you're all finished! (Select>Deselect or CNTRL-D) Step 12. Add a bevel and emboss filter to it
|
|
||||||||||||


| Home | Dreamweaver | Fireworks | Flash | Photoshop | Elements | PowerPoint| Ebay | QuickTime Pro | Flash 5 CD | Fireworks MX CD | QuickTime Support | Contact Copyright © 1999-2015 CBT Cafe, All rights
reserved CBT Cafe | Multimedia Learning | Interactive Graphics
|