Photoshop
7: Batch Processing
Objectives: To learn how to
customize and automate your workflow in Photoshop 7 by using
the Batch Processing command to quickly process large groups
of images.
Tools & Techniques: Actions,
commands, batch processing
In an earlier
lesson, you learned how to create your own actions for
tasks you repeatedly perform. In this lesson, we'll take it
a step further by applying our new action to a batch process.
Batch processing is useful
when you have a lot of images that require the same actions
to be applied to them. With a couple key strokes you can quickly
"process" an entire folder of images.
We'll use the action we created in the Actions
lesson but of course you can use your own or just follow along.
Step 1: Getting
Started
I have a folder of full sized images that need to be converted
to thumbnails. I also want them to have a drop shadow applied
to them and have them converted to .gif to use on my website.
I've already created my action to process each image, but
I surely don't feel like going through each image and applying
the action it.
Instead, I'll use the Batch Process
command to apply my action to my folder of images.
Step 2: Applying
the Settings
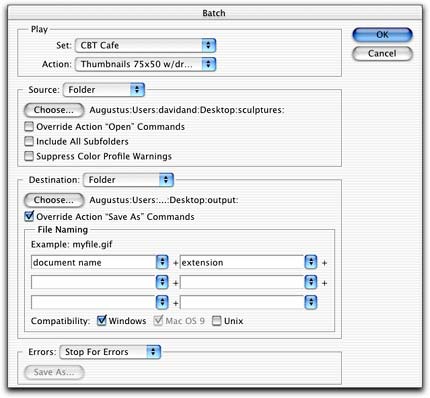
- Start by going to File>Automate>Batch...
- In the Play option, select
which Set contains the action
you want to apply. In this example, "CBT
Cafe" is the Set
I selected.
- Choose the Action to apply.
I only have one in this set and it's called: Thumbnails
75x50
w/drop shadow. If I had more actions in this Set
they would be visible from the drop down menu.
- In the Source option, choose
Folder from the drop down
menu and then click the Choose...
button to navigate to the folder containing your images.
- For Destination select Folder
from the drop down menu. Another option I frequently use
for Destination is the None
option. By selecting None, Photoshop applies the action
to the images but leaves the images open. This is helpful
if I want to preview my new images and determine if I need
to make any further edits to them. For this example, however,
we'll select a folder.
- After you select the Folder
option, click Choose... to
select your destination folder. You can select a current
folder or you can create a new one. I'll create a new one
called Output on my Desktop.
- The next option, Override Action "Save As" Commands, should be selected
if your action contains a "Save
As..." or "Save
for Web..." command. If your action doesn't
contain a "Save As..." command you'll need to
keep this option unchecked to save your files. Photoshop
will prompt you to save each file when this option is not
selected. For my example I'll select the option since I
have a "Save for Web..."
command in my action.
- Select a File Naming convention for your images. I generally use lowercase names and select
the 2nd option from the drop down menu
- The last option I typically select is for Errors:
Stop For Errors. This is very helpful for debugging
your commands.
 |
|