 |
|
|
||||||||||||
 |
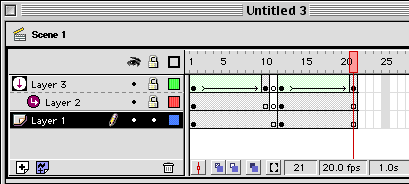
Step 4: Reuse the black rectangle animation on Layer 3
- Highlight Frame 1 through Frame 10 on Layer 3,
- Hold down the Alt Key and click and drag the highlighted frames over to frame 12. This will copy the frames. You should now have a Shape Tween from Frame 12 to 21.
 |
Step 5: Add another image to the masking animation
Now, here's where it gets a little tricky
- Copy the image on Layer 1 (right click on Frame 1, choose Copy Frames) and paste it to Layer 2 at Frame 12 (right click and choose Paste Frames). This is because we want to add another image to our masking movie and that new image needs to go on the bottom layer.
- On Layer 1, add a Keyframe (F6) to Frame 12.
- Delete the image at Frame 12 on Layer 1 and add a new image.
- Add Frames (F5) in Layers 1 and 2 at Frame 21. You should now have equal Frames for all 3 layers.
 |
Step 6: Test your movie
Lock all layers and preview your movie by dragging the playhead.
Step 7: Continue adding images
- Repeat the preceding steps to continue adding new images and wipes.
- You can add Stop Actions and Play Buttons to increase interactivity with the masking.
- You can also use rectangles that have gradients on them to create different transition effects.
| Page 1 | Page 2 |
|
|
|
| Home | Dreamweaver | Fireworks | Flash | Photoshop | Elements | PowerPoint| Ebay | QuickTime Pro | Flash 5 CD | Fireworks MX CD | QuickTime Support | Contact Copyright © 1999-2011 CBT Cafe, All rights
reserved CBT Cafe | Multimedia Learning | Interactive Graphics
|