Fireworks MX:
Changing the Color of a Bitmap Image
Version: Fireworks
MX
Level: Easy-Medium
Objectives: In this lesson we want to select part of an image
for the purpose of changing its color.
Tools & Techniques: Feathered edges, Magic Wand, Marquee
Tools, Basic Selection Techniques, Lasso Tool, Adjusting Image
Color
Step 1: Creating the Selection
- Using the Zoom
Tool (Z) to zoom in close to the object you're going
to select.
- While you can use any of the
selection tools for this example: Lasso, Magic
Wand, or
Marquee Tools, I prefer to use the Oval Marquee Tool.
- Select the Oval
Marquee Tool.
- In the Property Inspector set
the Edge
to Feather with an Amount of
4
- Holding down the Shift
Key, drag an oval selection around one of the yolks
- Before you release the mouse
button, press the Space Bar
as you continue to hold down the Shift
Key and drag the selection to reposition it over
the yolk. This is a great feature included in Fireworks
MX that allows you to modify the position of your selection
while still creating it.
- Continue dragging in or out to
resize your selection. If
you need to reposition your selection again just hold down
the space bar (while still holding down the shift key) and
drag your selection where you want it.
NOTE:
You don't need to hold down the Shift
key. I'm doing it in this example because the egg yolks
are near perfect circles. More than likely I will need to
go in and use the Lasso
Tool to modify the selection.
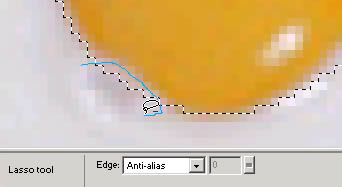
Step 2: Modifying the Selection
If you notice, part of the yolk
is indented in the bottom left corner and as a result, there
is a little more white inside
the selection that we'd probably like. To be honest, the feathering
takes care of most of that and when we view the image at 100%
it's really not discernable. But, since we're working with
Selections
we should go by the book on this one and bring up the Lasso
Tool (L) to go in and remove that extra bit of white from
our selection.
- Select your Lasso
Tool (L) by clicking the L
key.
- Set the Lasso Tool's edge to
Anti-Alias in the Property
Inspector.
- Hold down the Alt
key to bring up the Minus
sign next to the Lasso Tool
to indicate we'll be subtracting from our selection.
- Click and drag a small selection
around the white area inside the original selection.
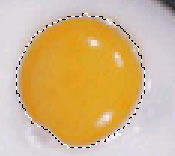
And the selection after the Lasso
Tool (L):
Step 3: Changing the Color
Now the easy part: changing the
color.
- Go
up to Xtras>Adjust Color>Hue/Saturation...
- Check
the Colorize
button above the Preview
button. Make sure Preview
is selected to preview your changes in real time.
- Adjust
the sliders for Hue, Saturation,
and Lightness to create
the new color.
And your
final image:
Did you
know...
You can also modify selected parts of a larger, more detailed
image, for example, change the color of a person's shirt or
hat using selections. To find out more about creating selections,
click
here.
|